
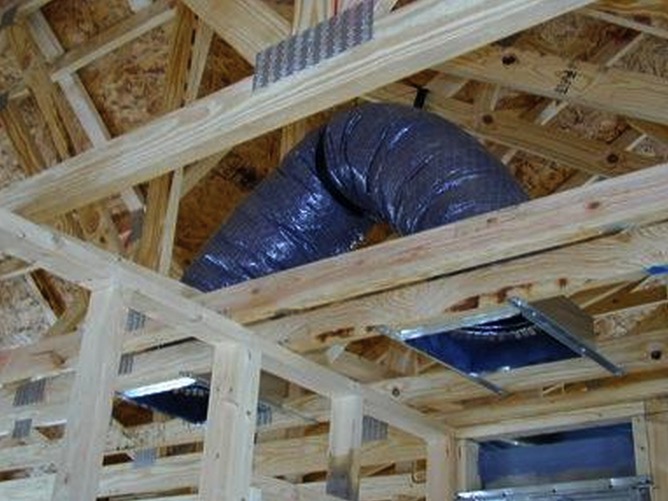
Poor airflow in a bedroom can make the space uncomfortable, especially when the door is closed. While problems sometimes require air duct installation or other HVAC improvements, a jumper duct can provide a simpler way to improve return airflow and balance room pressure.
What Are Jumper Ducts?
A jumper duct, also called a jump duct, is a passive return-air pathway used to move air from a closed room to an area that has access to the HVAC system’s central return. A common setup uses one ceiling grille inside a bedroom, another grille in a hallway or other central space, and a short length of duct connecting the two above the ceiling.
When the HVAC system supplies conditioned air to a bedroom, roughly the same volume of air needs a path out of that room. With the door open, air can move freely toward the central return. Once the door closes, the doorway is no longer available as that large return path. If the only escape path is a small gap under the door, pressure can build inside the room. That pressure can make it harder for the supply register to deliver its intended airflow.
A properly sized HVAC jumper duct gives displaced room air another, lower-resistance route out of the room, helping keep pressure between the bedroom and the rest of the house balanced. Air moves through the duct into the hallway and then continues toward the central return grille. DOE guidance recommends providing an adequate return-air path from rooms where doors may be closed.
This type of transfer pathway is therefore part of the return-air strategy, even though it usually does not connect directly to the HVAC return ductwork.
How A Jump Duct Helps Poor Airflow
Inadequate return air becomes a likely suspect when a room receives supply air normally with the door open but becomes uncomfortable after the door has been closed for a while. In this situation, a jump duct HVAC solution can provide pressure relief without adding a fully ducted return.
Homeowners may notice a bedroom that gets warmer overnight, weaker register airflow with the door shut, air rushing beneath the door, or a door that moves slightly when the blower starts. An HVAC technician can diagnose the issue more precisely by measuring room-to-hall pressure with the system operating and the bedroom door closed.
A commonly used building-performance target is to keep the pressure difference across a closed interior door below about 3 pascals.
The door test is especially useful because it helps separate return-air problems from other HVAC problems. A room that remains uncomfortable with the door wide open is less likely to be suffering primarily from a restricted return path. Supply-duct restrictions, poor balancing, duct leakage, insulation deficiencies, window heat gain, and room load should then receive more attention.
Do Jumper Ducts Help Cool Rooms?
When inadequate return airflow is contributing to the comfort problem, AC jumper ducts can help produce more consistent temperatures throughout the home.
The result can be especially noticeable in bedrooms where doors remain closed for many hours at night.
A passive transfer path does not increase the cooling capacity of the air conditioner or generate additional cold air. Its benefit comes from improving the circulation of air the HVAC system is already trying to deliver.
The improvement depends on the actual cause of the room’s temperature problem. These pathways address the air-return side of the circulation equation, so installing jumper ducts is most useful when a restricted return path is part of the problem.
Jump Duct HVAC Vs. Return Vent
A passive transfer duct creates a pathway between rooms. A dedicated return creates a pathway from the room into the HVAC return duct system.
With a typical transfer setup, air leaves a bedroom through one grille, travels through a short duct, and exits through another grille into a hallway or common area. From there, the air reaches the home’s central return grille.
With a dedicated return, the bedroom return grille is connected by ductwork to the system’s return plenum or return trunk. The air therefore has its own ducted route back toward the air handler. DOE building-science guidance recognizes both dedicated returns and passive approaches such as transfer grilles and an HVAC jumper duct as ways to provide return-air paths.
Dedicated returns can provide excellent room-by-room airflow control, particularly when properly sized and sealed. The dedicated return gives the room a more direct path back to the HVAC equipment and can be useful when substantial airflow must be handled. It also requires a suitable route for new return ductwork and proper connection to the existing return system.
Passive transfer ducts can be practical in existing homes because the installation may require substantially less new return ductwork. This approach can be much easier to retrofit when the bedroom and hallway share accessible attic space, which is one reason jumper duct installation is common in suitable layouts.
A well-sized transfer duct cannot perform properly if it discharges into a hallway that is itself separated from the main return by another closed door or other significant restriction.
The appropriate design depends on available space, system airflow, home layout, pressure measurements, noise considerations, and local mechanical requirements.
Where To Install An HVAC Jumper Duct
A typical jump duct HVAC setup connects a ceiling grille in the room needing pressure relief with a second ceiling grille in a hallway or common area that has an unobstructed path to the central return.
The room-side grille should be positioned where furniture, curtains, shelving, and doors are unlikely to restrict it. The receiving grille should open into a sufficiently large common area rather than another room that frequently remains closed.
Ceilings are commonly used because attic access makes the connection relatively straightforward. The two grilles do not need to sit directly opposite each other.
Duct routing matters as much as grille location. A short route with smooth routing is preferable when choosing grille locations, and a jumper duct installation should avoid unnecessary bends or long sections of compressed flex duct.
Where privacy matters, separating the two grille locations and using a ducted path also helps reduce direct transmission of light and conversation between the spaces. Building Science Corporation specifically identifies flex duct, sound-absorbing materials, and indirect airflow paths as ways of limiting sound transmission through return-air transfer systems.
The best location is therefore determined by more than the shortest distance between two ceilings. Grille accessibility, duct routing, noise transmission, framing, attic conditions, and the path from the receiving grille to the central return all matter.
How To Install A Jumper Duct
A successful retrofit starts with confirming that the room actually has a return-air-path problem. Ideally, the technician measures pressure with the HVAC blower running and the room door closed, checks supply airflow, and estimates how much air the transfer path needs to handle before installing jumper ducts.
Determine the required airflow and duct size. Size the duct and grilles for the room’s supply airflow and an acceptably low pressure drop rather than selecting a duct diameter solely because it fits between framing.
Choose both grille locations. One grille serves the closed room; the other opens into a hallway or common area with access to the central return. Before cutting, inspect the attic for joists, trusses, electrical wiring, plumbing, recessed lights, fire blocking, insulation, fire assemblies, and other obstructions.
Cut and install the ceiling boots or collars. Secure the components so the grilles fit cleanly and air cannot bypass the intended pathway.
Connect the duct. Seal duct connections and support flexible duct so it remains round rather than compressed or deeply sagging.
Restore the ceiling air barrier and insulation. Any penetrations into an attic or other unconditioned area should be properly sealed, and ductwork in unconditioned space should be appropriately insulated.
After installation, operate the system with the bedroom door closed and check the result. Register airflow, room pressure, noise, and temperature performance provide more useful confirmation than simply feeling air at the transfer grille.
Local mechanical, fire, energy, and building-code requirements should be checked before altering ceiling assemblies or HVAC airflow pathways. A professional jumper duct installation should account for those requirements as part of the work.
What To Know Before Installing Jumper Ducts
The most important sizing principle is that an HVAC jumper duct should be selected for the airflow it needs to transfer at very low pressure, not simply matched to a convenient duct diameter. A large bedroom or primary suite receiving significant supply airflow may require considerably more transfer capacity than a small bedroom. Research on transfer systems specifically bases grille and duct sizing on room airflow and the allowable pressure difference across the closed door. Bedroom floor area by itself is not enough to determine the correct size because two similarly sized rooms can receive very different amounts of supply air.
Grille size matters too. The visible dimensions of a grille are not the same as its effective open area because louvers and framing restrict part of the opening. An undersized grille can become the bottleneck even when the duct behind it is adequately sized. The duct and grilles need to work as one airflow path. Increasing duct diameter accomplishes little when air still has to squeeze through a restrictive grille or fitting.
For attic installations, keep the duct as short and direct as practical. Flexible duct should remain fully expanded, supported at appropriate intervals, and protected from crushing beneath insulation or storage. A tightly bent section immediately above a ceiling boot can become one of the most restrictive parts of the entire installation. Long loops and deep sags add resistance as well. Connections should be mechanically secured and sealed.
Any duct exposed to attic temperatures should also have appropriate insulation and a suitable exterior vapor-retarder jacket for the climate and application. DOE guidance emphasizes sealing and insulating ducts located in unconditioned spaces to limit leakage and unwanted heat transfer. The insulation jacket should remain intact. Joints should be sealed rather than relying on the insulation surrounding the connection.
Jumper Duct Installation Mistakes
Many transfer-path problems come from excessive resistance. A duct that is too small, a grille with inadequate free area, several tight elbows, sharply kinked flex duct, or a long sagging run can restrict a system that depends on only a few pascals of pressure to move air.
Poorly stretched flexible duct is a particularly important detail. Deep interior corrugations and sagging increase friction, reducing the amount of air that can pass through the pathway.
Noise can appear when too much airflow is forced through a small grille or duct opening. Homeowners may hear rushing, hissing, or whistling during blower operation.
Other problems include terminating the pathway in another closed room, leaving attic duct joints unsealed, compressing the duct under insulation, placing a grille where furniture blocks it, and installing the system without testing the final room pressure.
Attic leakage is another concern. A loose duct connection can allow hot, dusty attic air to enter the pathway instead of transferring only conditioned-house air.
Finally, skipping post-installation testing leaves no way to know whether the original pressure problem was actually corrected.
A jumper duct should be treated as an airflow component that needs to be sized and verified, rather than simply as a hole connecting two spaces. Careful planning is especially important when installing jumper ducts in an existing home.
When AC Jumper Ducts Aren’t Enough
AC jumper ducts are most effective when the room already receives appropriate supply air and the missing return pathway is creating excessive pressure when the door closes.
Door position remains one of the most useful diagnostic clues. When the room becomes uncomfortable primarily after the door closes, the return path deserves close attention. When the room performs poorly with the door open as well, the investigation should include supply airflow, duct condition, system balancing, and the room’s heating or cooling load.
A weak supply can result from an undersized branch duct, partially closed damper, damaged flex duct, restrictive register, excessive duct length, disconnected ductwork, leakage, or poor system balancing.
Room load can also exceed what the existing supply was designed to handle. Large west-facing windows, an uninsulated attic above the room, significant exterior wall exposure, air leakage, or added electronics and occupants can all increase the amount of cooling the room requires.
The home’s HVAC system may also have a broader airflow problem. A dirty filter, restrictive coil, incorrect blower setting, poorly designed duct system, or equipment issue can affect multiple rooms.
AC jumper ducts may also have limited benefit when the required airflow would make the passive pathway impractically large or when architectural, acoustic, fire-safety, or code considerations restrict where transfer openings can be installed. In those situations, a properly designed dedicated return may be more appropriate.
Large primary bedrooms present another consideration. If a room receives substantial supply airflow, the passive return pathway needed to handle it may become large enough that a dedicated return is more practical. In borderline cases, a jump duct HVAC design should be evaluated against the dedicated-return option before work begins.