An unfinished basement can easily become the part of the house everyone forgets about. It holds holiday decorations, spare boxes, old furniture, and the occasional home improvement project that never quite gets finished. Yet beneath all that unused space may be an opportunity to make your home more comfortable, practical, and adaptable to your family’s needs.
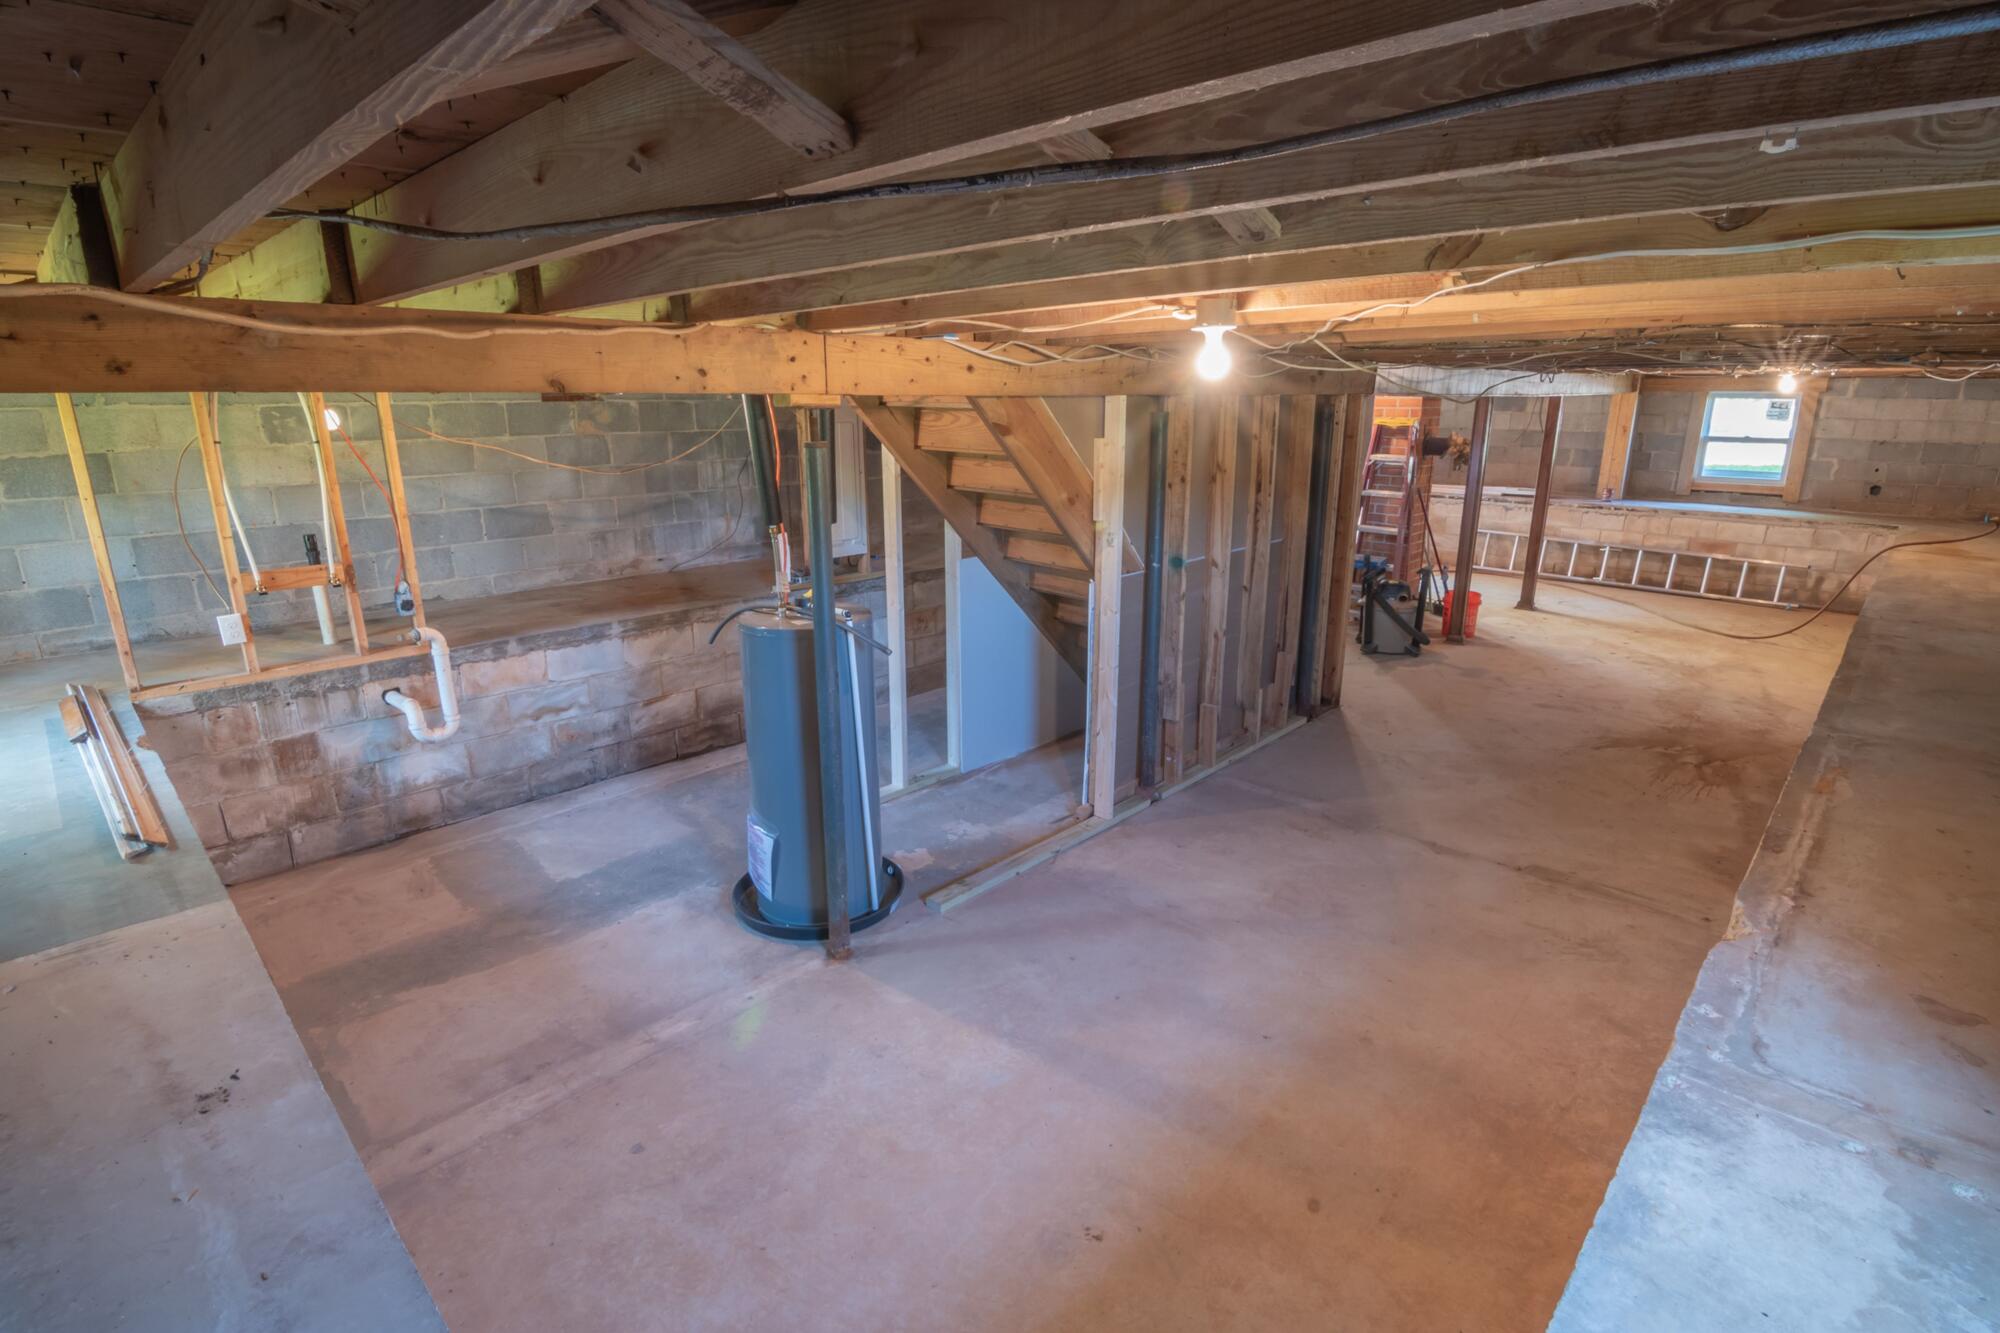
As the photo illustrates, an unfinished basement often starts with exposed timber framing, concrete block walls, plumbing, a water heater, and an open floor plan. Although it may not look like a finished room yet, these features provide a useful starting point for planning a basement renovation.
The secret is to look beyond paint colors and flooring. A successful basement conversion begins with moisture management, proper insulation, ventilation, and building safety. Once those essentials are addressed, the possibilities for creating a welcoming living area become much more exciting.
Why Renovate an Unused Basement?
Finishing a basement allows homeowners to make better use of the square footage they already have. Instead of building an addition or moving to a larger house, you may be able to create the extra room you need below the main living areas.
The best part is the flexibility. A basement can evolve as household needs change.
Popular basement renovation ideas include:
- Family room: Create a comfortable place for movie nights, games, and relaxing together.
- Home office: Establish a dedicated workspace away from the busiest rooms in the house.
- Guest bedroom: Add sleeping accommodations when local building and safety requirements permit.
- Hobby room: Make space for crafting, music, exercise, or other activities.
- Playroom: Give children a designated area for toys, games, and creative projects.
- Laundry and utility area: Organize household equipment and supplies while keeping essential maintenance access available.
Before choosing a layout, think about how your household actually lives. A well-designed basement should solve a real problem, not simply add another room that rarely gets used.
Start With a Thorough Basement Inspection
Before installing drywall, flooring, or built-in cabinets, examine the existing basement carefully. The open structure shown in the photo makes it easier to see many of the features that could become hidden behind finished walls.
Look for Signs of Moisture
Check foundation walls, floor edges, plumbing connections, and the areas around windows for water stains, discoloration, peeling coatings, musty odors, or visible mold.
A basement can appear dry on the day of an inspection and still experience water intrusion during heavy rain or seasonal changes. Look for signs of previous flooding and ask whether the space has experienced leaks.
Also inspect the exterior of the home. Clogged gutters, poorly directed downspouts, and ground that slopes toward the foundation can allow water to collect near basement walls.
Correct the source of moisture before moving forward. Depending on the problem, solutions may include improving surface drainage, repairing plumbing, sealing appropriate penetrations, or installing a professionally designed drainage system.
The U.S. Environmental Protection Agency recommends correcting moisture problems before converting a basement into living space. Covering damp surfaces with new finishes can conceal problems rather than solve them. (EPA guidance on basement remodeling.)
Check the Structure and Utilities
Inspect exposed beams, posts, stairs, electrical wiring, and plumbing. Look for damaged wood, corrosion, sagging, or signs of previous repairs that need further investigation.
The water heater and other mechanical equipment visible in the reference photo should remain accessible for maintenance. Any required service clearances and combustion-air provisions must be preserved.
Have a qualified professional investigate structural concerns, questionable wiring, or plumbing issues before construction begins.
Control Moisture Before Finishing the Walls
Moisture control is one of the most important parts of basement renovation. Because foundation walls and concrete floors are in contact with the ground, they can be affected by groundwater, water vapor, and condensation.
Address Water From Outside
Begin by checking the home’s drainage system. Clean the gutters, repair leaking downspouts, and direct roof runoff away from the foundation in accordance with local requirements.
The ground surrounding the house should generally slope away from the foundation. If water regularly collects near basement walls, a drainage professional may need to evaluate grading, foundation drainage, or other waterproofing measures.
For basements with recurring seepage, a sump pump or interior drainage system may be appropriate. The correct solution depends on where the water originates and how it enters the space.
Manage Indoor Humidity
Even without a visible leak, humid air can condense on cool concrete walls and floors. A properly sized dehumidifier may help manage humidity, but it should complement—not replace—repairs to water intrusion or condensation problems.
Use a hygrometer to monitor relative humidity. A practical target is generally around 30% to 50%, adjusted for the climate and the building’s conditions. Investigate persistent dampness or condensation rather than relying solely on the dehumidifier.
Avoid installing carpet, wood framing, or moisture-sensitive finishes directly against damp concrete or masonry. Building Science Corporation explains that poorly designed basement insulation and wall assemblies can trap moisture and contribute to mold and material deterioration. (Basement insulation guidance.)
Choose the Right Insulation for a Basement
Basement insulation helps improve comfort and reduce unwanted heat transfer. However, below-grade walls behave differently from ordinary above-ground walls, so the installation needs to account for moisture as well as temperature.
Insulate Foundation Walls Correctly
Depending on the climate, foundation design, and applicable codes, suitable options may include rigid foam insulation, certain closed-cell spray foam systems, or engineered insulation assemblies designed for below-grade use.
The important consideration is how the complete wall system handles air movement, water vapor, and drying potential. Insulation should be selected and installed as part of a coordinated moisture-control strategy.
Do not simply place fiberglass batts against concrete walls and cover them with drywall. If moisture accumulates within the assembly, the insulation, framing, and finishes can be damaged.
A building professional familiar with basement construction can recommend an appropriate assembly for the home’s specific conditions.
Do Not Forget the Ceiling and Rim Joists
The exposed wooden joists in the reference photo offer an opportunity to inspect the floor structure above and identify air leaks.
Air sealing and insulation around rim joists—the areas around the perimeter where floor framing meets the foundation—can improve comfort and energy performance when designed correctly.
Whether the basement ceiling should be insulated depends on the home’s heating and cooling arrangement, the location of the thermal boundary, and applicable requirements. If the basement will become conditioned living space, insulating the foundation perimeter is often an important part of the overall strategy.
Improve Basement Ventilation and Indoor Air Quality
A comfortable basement needs more than a fresh coat of paint. It also needs a reliable way to manage humidity, odors, and indoor pollutants.
Start by evaluating the existing heating, ventilation, and air-conditioning system. Extending existing ductwork may be possible, but the system should be checked to confirm it can handle the additional conditioned space.
Depending on the layout, a dedicated ventilation system, suitable exhaust fans, or supplemental heating and cooling may be necessary.
Bathrooms and kitchenettes require particular attention because they introduce additional moisture. Exhaust fans should discharge outdoors rather than into the basement ceiling, attic, or another enclosed space.
Radon is another consideration. It is an invisible radioactive gas that can enter buildings through foundation openings. The EPA recommends testing the lowest lived-in level of a home, including a basement that is being converted into living space. If levels are elevated, consult a qualified radon mitigation professional.
Do not assume that opening a window or running a portable fan provides adequate ventilation. A balanced approach to ventilation, humidity control, and air sealing helps create a healthier indoor environment.
Plan for Safety, Permits, and Building Codes
Before finalizing your basement design, check local building requirements. Rules vary by jurisdiction, and a project that involves adding a bedroom or bathroom may trigger requirements that do not apply to a simple storage or recreation area.
Make Emergency Exits a Priority
If the basement will include a bedroom, emergency escape and rescue openings are especially important. Depending on local code, an appropriately sized egress window or another approved exit may be required.
Requirements can include minimum opening dimensions, maximum sill height, window wells, and unobstructed access. Do not assume an existing small basement window qualifies.
The International Residential Code provides provisions for emergency escape and rescue openings, but the locally adopted code and the building official determine the requirements for a particular project. (International Residential Code, Chapter 3.)
Address Electrical, Fire, and Stair Safety
Basement renovations may require new electrical circuits, outlets, lighting, smoke alarms, and other safety features. Bathrooms, laundry areas, and spaces near water may also require specific electrical protection.
The staircase in the reference image should be inspected for safe dimensions, secure handrails, adequate headroom, and appropriate lighting. Finished walls and ceilings must not create hazards or obstruct required exit routes.
If fuel-burning equipment remains in the basement, ensure that combustion air, venting, and required clearances are maintained. Carbon monoxide alarms should be installed where required.
Obtain permits before beginning work when required. A licensed electrician, plumber, HVAC contractor, or general contractor can help coordinate the project and ensure that critical work meets local standards.
Choose a Layout That Makes the Space Feel Welcoming
Once moisture, insulation, ventilation, and safety have been addressed, it is time to plan the interior.
The reference basement has a broad open floor area, visible structural elements, and a staircase that naturally divides portions of the room. These existing features can guide the design.
Work Around the Staircase and Utilities
Use the staircase as a natural transition between zones. For example, a family room might occupy the largest open area, while a compact desk or reading corner fits beneath the stairs if headroom and access allow.
Keep utility equipment behind an appropriately designed enclosure when permitted, but maintain the clearances and access required for servicing. Never box in equipment without checking its ventilation and safety requirements.
Make the Most of Limited Natural Light
Small basement windows can make a finished room feel darker than an upstairs living area. Use layered lighting to compensate.
Consider recessed or surface-mounted ceiling fixtures, wall sconces, and floor lamps. Choose a warm, comfortable color temperature for relaxing spaces and brighter task lighting for work areas.
Light neutral wall colors, mirrors, and carefully positioned furniture can also help the room feel more open. Avoid blocking windows with tall furniture or heavy window treatments.
Select Durable, Basement-Friendly Finishes
After confirming that the floor and walls are dry and suitable for finishing, choose materials that can tolerate the basement’s conditions.
Options may include:
- Properly specified luxury vinyl plank flooring or tile.
- Moisture-appropriate wallboard and trim systems.
- Washable wall paint compatible with the wall assembly.
- Modular storage that keeps belongings organized and accessible.
- Area rugs that can be removed for cleaning and drying.
No flooring material is a substitute for correcting water intrusion. Choose products based on the actual moisture conditions and the manufacturer’s installation requirements.
Set a Realistic Basement Renovation Budget
The cost of finishing a basement varies considerably. The size of the space, the condition of the foundation, local labor rates, and the complexity of the project all influence the final price.
A straightforward family room may require relatively few changes, while a basement with persistent water problems, a new bathroom, or a bedroom requiring an egress window can involve substantial additional work.
Build your budget around the following categories:
- Inspection, design, permits, and professional fees.
- Drainage repairs and moisture control.
- Insulation and air sealing.
- Electrical, plumbing, and HVAC work.
- Framing, drywall, flooring, and painting.
- Lighting, furnishings, and storage.
- A contingency reserve for concealed problems.
Request itemized estimates and compare the scope of work rather than looking at the total price alone. It is also wise to reserve approximately 10% to 20% of the budget for unexpected expenses, adjusting that amount to reflect the condition and uncertainty of the project.
If the budget is limited, consider renovating in phases. Address water management and safety first, then complete insulation and mechanical work before moving on to finishes and furniture.
Conclusion: Turn an Overlooked Basement Into a Space That Works
An unused basement can become a family retreat, a productive home office, a hobby room, or an inviting guest area. The best results come from balancing attractive design with the practical work that makes the space comfortable and safe.
Start with a careful inspection, solve moisture problems, select an appropriate insulation system, and plan ventilation, emergency access, and utility clearances before finishing the interior. Then build a layout around the way your household wants to use the room.
The unfinished basement in the reference photo is a reminder that valuable living space does not always require a larger footprint. With thoughtful planning and the right professional guidance, the space you already have can become one of the most useful parts of your home.
Key Takeaways
- Inspect the foundation, plumbing, framing, and existing utilities before starting a basement renovation.
- Correct leaks, drainage issues, and persistent dampness before installing finished walls or floors.
- Choose insulation and wall assemblies that account for moisture movement and condensation.
- Plan adequate ventilation, humidity management, and radon testing.
- Check local permits, emergency escape requirements, electrical safety, and fire protection.
- Keep water heaters, electrical panels, and mechanical equipment accessible and properly ventilated.
- Select durable finishes suited to below-grade conditions.
- Build a realistic budget that includes professional work and a contingency reserve.
Frequently Asked Questions
1. How do you turn an unfinished basement into living space?
Begin with an inspection of the foundation, plumbing, structure, and utilities. Resolve moisture problems, plan insulation and ventilation, confirm code requirements, and then complete the framing, electrical work, wall finishes, flooring, and lighting.
2. What should you do before finishing a basement?
Check for leaks, water stains, musty odors, condensation, damaged framing, and drainage problems. Review the existing heating and ventilation systems, test for radon, and determine which permits and inspections are required.
3. How do you keep a finished basement dry?
Maintain gutters and downspouts, direct runoff away from the foundation, correct plumbing leaks, and address groundwater intrusion. Monitor indoor humidity and use suitable dehumidification when needed. Persistent water entry may require professional waterproofing or drainage improvements.
4. What is the best insulation for basement walls?
There is no single best option for every basement. Rigid foam, suitable spray foam systems, and other engineered assemblies may work, depending on climate, foundation conditions, and local codes. The complete system should control heat transfer and air leakage while managing moisture safely.
5. Does a basement need ventilation?
A finished basement needs appropriate ventilation and conditioning to manage indoor pollutants, odors, and moisture. The solution may involve the home’s HVAC system, mechanical ventilation, or dedicated exhaust systems, depending on the space and its intended use.
6. Can you put a bedroom in an unfinished basement?
Potentially, yes, but the basement must meet applicable requirements for emergency escape, ceiling height, light, ventilation, smoke alarms, and other safety provisions. Consult the local building department before planning a basement bedroom.
7. Do you need a permit to finish a basement?
Many jurisdictions require permits for some or all basement finishing work, especially when it involves structural changes, electrical systems, plumbing, HVAC modifications, or creating a bedroom. Requirements vary, so check with the local building department before starting.
8. Does finishing a basement increase home value?
A well-executed basement renovation may improve a home’s appeal and usable living area. The financial return depends on local market conditions, renovation quality, the home’s existing features, and how buyers value the additional space. Avoid assuming that every renovation will recover its full cost.