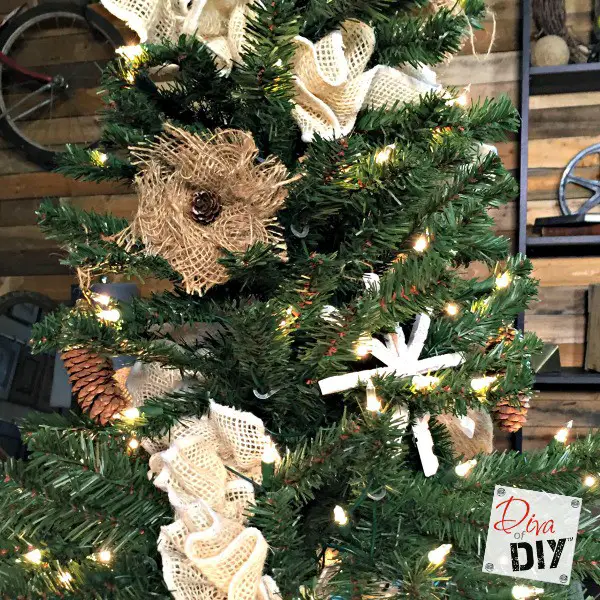
This is a step-by-step guide on how to make burlap flowers. By the end of this post, you should be able to know precisely how you can make burlap flowers seamlessly.
Let’s face it: if you are serious about adding some texture and interest to any of your arrangements, the design of your flowers using a burlap material will be your best bet.

And the best of all is that these flowers you make can serve as accessories, clothing, or used for decoration purposes. In other words, you have a couple of options.
In this post, you’ll know how to make burlap flowers step-by-step. Let’s cut to the chase:

Step-By-Step on How to Make Burlap Flowers
Step 1:

I’m guessing that you have already assembled the items you will use for this process, so let’s begin. In the first step, you need to get a strip and apply hot glue on it. Next, you want to make sure that it is one inch one end of the burlap strip.
Step 2:

Once you have attained the one-inch distance, you need to start folding the burlap’s edge onto the hot glue, then make sure that you are holding it down until it starts to dry. If you like, you can leave it for about five seconds or so to dry. If you don’t want to risk your fingers burning, make sure that you use a clothespin.
Step3:

Now, you need to move that end (burlap strip) that wasn’t glued to the opposite direction. Next, you want to pull a thread located about a third to one side.
Step 4:

Once you start pulling, you need to continue pulling until you reach the other end with the glue. But hold on there. Can you see how it is beginning to curl naturally into the shape of a flower?
Step 5:

The next step is to secure the shape of your flower using hot glue.
Step 6:

At this point, you need to hold it until it starts to dry, then take it aside.
Step 7:

At stage 7, you need to include glitter to the pine cones. To the end of the pine cone, you need to apply the mod podge using a paintbrush.
Step 8:

Now, you need to secure the bottom by covering it (glittered pine cone) using hot glue. Once that is done, press the top of your burlap flower.
Step 9:

Hold your burlap flower in place. And Hurray! You have a handmade burlap flower that is simple, appealing, and inexpensive. So that’s it – as simple as that.
Bottom Line

Making burlap flowers doesn’t have to cause you sleepless nights. With this simple process, you can be able to create beautiful and inexpensive burlap flowers that your friends and relatives would envy. You now know how to burlap flowers. So take action now and see if you can do it on your own.
 Title: How To Make Burlap Flowers Step By Step
Are you looking to add a touch of rustic charm to your decorations or accessories? Burlap flowers are the perfect way to bring a natural and textured element to your projects. In this step-by-step guide, we will walk you through the process of making beautiful burlap flowers that can be used in a variety of ways, from home decor to fashion accessories. By the end of this post, you will have the knowledge and skills to create stunning burlap flowers seamlessly.
Materials Needed:
before we get started, gather the following materials:
- Burlap fabric
- Scissors
- Hot glue gun
- Floral wire
- Floral tape
- Button or bead for the centre (optional)
Step 1: Cutting the Burlap
- Begin by cutting the burlap fabric into strips. The width of the strips will determine the size of your flower. For a larger flower, cut wider strips, and for a smaller flower, cut narrower strips.
- You can also experiment with cutting the strips on a diagonal for a more textured look.
Step 2: Creating Petals
- Take a burlap strip and fold it in half lengthwise.
- Next, fold the strip in half again to form a smaller rectangle.
- Round off one end of the rectangle to create a petal shape.
- Cut small slits along the rounded edge to add texture to the petal.
Step 3: Assembling the Flower
- Take one petal and roll it tightly to form the center of the flower.
- Secure the rolled petal with hot glue.
- Continue adding petals around the center, slightly overlapping each petal to create a full and layered look.
- As you add more petals,the flower will begin to take shape.
Step 4: Attaching the Stem
- Cut a piece of floral wire to your desired length for the stem.
- Apply hot glue to the end of the wire and insert it into the base of the flower.
- Wrap floral tape around the base of the flower and the wire to secure it in place.
Step 5: Adding a Center (optional)
- To embellish your burlap flower, you can glue a button or bead to the center.
- This step adds a decorative touch and can personalize your flower even further.
Benefits of Making Burlap flowers:
- Affordable and eco-amiable craft option.
- Customizable to fit any color scheme or style.
- Versatile for use in various projects, including home decor, weddings, and gifts.
These burlap flowers are not only beautiful but also easy to make, making them a perfect DIY project for craft enthusiasts of all skill levels. Get creative with different colors, sizes, and textures of burlap to create unique floral designs that suit your personal taste and style.
So, gather your materials, follow these simple steps, and start crafting your own stunning burlap flowers today! Personalize your creations to add a touch of rustic elegance to your next project.


These burlap flowers are such a cute DIY project! Can’t wait to try making them for my next event!
I love how versatile burlap is! These flowers will add a lovely rustic touch to any decor. Thanks for the tutorial!