A kitchen cart is the nomad of the culinary world: handy, mobile, full of potential-but all too often it looks like a temporary visitor rather than an intentional member of the household. Transforming that freestanding trolley into a lasting, well-styled feature is less about masonry and more about method: thoughtful placement, cohesive styling, and a few design tricks that make mobility feel purposeful.
This article shows how to give a kitchen cart the presence of built-in furniture without sacrificing its adaptability. You’ll find practical guidance on anchoring and placement, choosing finishes and hardware that echo your kitchen’s palette, organizing for both function and visual calm, and layering lighting and accessories so the cart reads as a considered part of the room.
Whether your aim is to create extra prep space, a beverage station, or a displayworthy storage hub, the right approach will make the cart feel permanent-anchored in purpose and aesthetics. Read on to learn how small design choices can turn a humble utility piece into a signature element of your kitchen.
Choose the ideal cart and placement so it reads like a built in feature
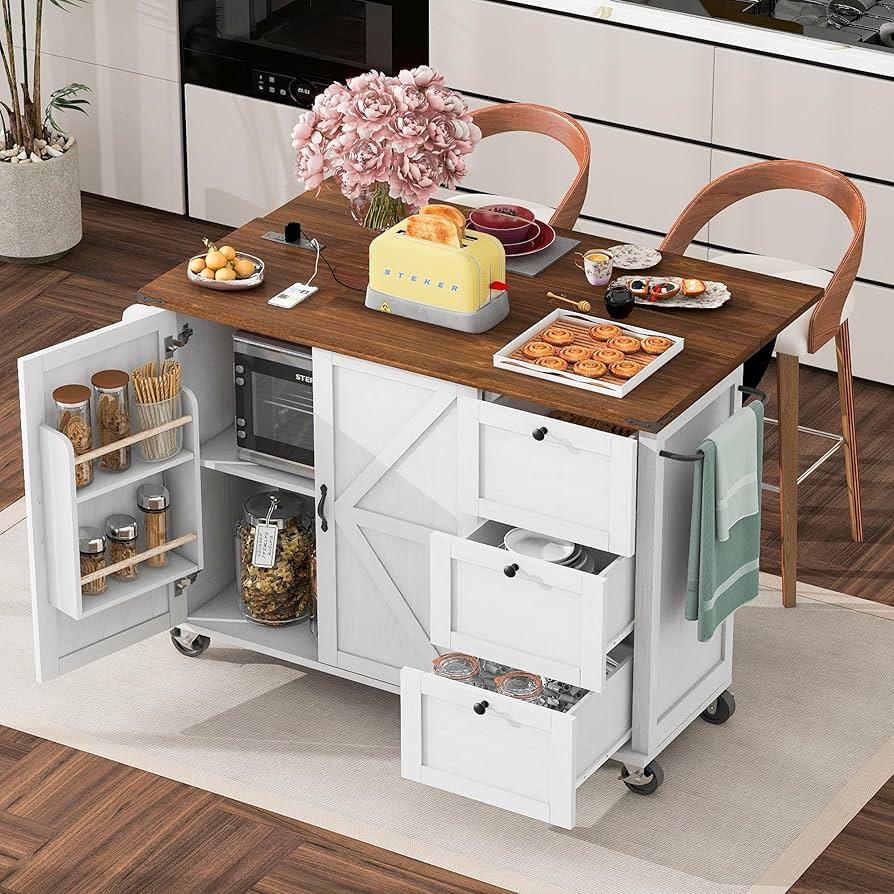
Pick a cart that answers the room’s scale and finishes as if it were always part of the architecture: choose the right scale so it aligns with neighboring countertops, favor a matching or complementary countertop material, and opt for hardware and paint that echo your cabinetry.Favor a model with a recessed plinth or removable legs so you can shim it to floor level and disguise the gap with a continuous toe‑kick. For permanence, plan how you’ll fasten it to the wall-simple brackets into studs or an L‑bracket hidden under the countertop will make the piece feel immovable and intentional rather than temporary.
Placement is about sightlines and flow as much as function.Aim to tuck the cart flush with an adjacent cabinet run or sit it within an alcove so it reads as part of the layout; add a slim trim or a short run of molding to the cart’s edge to harmonize with existing millwork. Practical touchpoints to consider while positioning the piece include:
- Height match: set the worktop level with counters or slightly lower for a butler’s station.
- Aisle clearance: maintain at least 36″ of walkway for comfort.
- Anchor points: secure to studs or to the cabinet next to it for stability.
- Visual finish: add molding, paint, or a backsplash strip to tie it into the run.

Anchor the cart visually and structurally with trim, fixings and complementary surrounding styling
Lock the cart into place both visually and physically so it reads as a built-in rather than a movable afterthought. Secure with discreet fixings-L‑brackets to studs, anti‑tip straps, or a slim bolt through the baseplate-and dress those connections with trim that echoes nearby joinery: a continuous toe‑kick, a small cornice, or a tailored apron will disguise seams and create the illusion of permanence. Consider materials that bridge utility and style: a slim metal bracket finished to match your hardware,a painted ply filler that can be caulked and painted flush,or a sanded and stained cap that ties into adjacent cabinetry.
- Structural fixes: L‑brackets, anti‑tip kits, floor bolts
- Trim choices: baseboard wrap, quarter‑round, small crown
- Finish tricks: matching paint sheen, edge banding, shadow gap
Surrounding styling completes the trick-use complementary finishes, consistent hardware, and simple details to integrate the cart into the kitchen’s rhythm. Keep scale in mind: a chunky butcher‑block top pairs with a wider plinth,while a delicate metal cart benefits from slender moulding. Add visual anchors like a short backsplash extension, a pair of matching sconces, or a slim floating shelf above to align sightlines and create balance. The following rapid reference helps match trim to mood so the cart feels intentionally placed.
| Trim | Finish | Best for |
|---|---|---|
| Toe‑kick | Painted | Seamless built‑in look |
| Crown edge | Stained wood | Customary warmth |
| Metal apron | Powder coat | Industrial chic |
Outfit the cart for everyday use with smart storage, defined work zones and appliance staging
Think of the cart as a micro-kitchen: equip it with clever compartments that keep daily routines flowing. Fit a shallow drawer for cutlery, a slide-out cutting board for instant prep, and a row of over-the-edge hooks for towels and measuring spoons. Add modular baskets for produce, a magnetic strip for knives, and clear labeled jars for frequently used staples so everything is visible at a glance.Small touches-non-slip liners,stackable trays and a slim charging dock-turn scattered tools into a tidy,reliable hub centered on smart storage and clearly defined work zones.
Stage appliances so the cart supports a predictable workflow: heavy appliances sit low, everyday-use gadgets stay at hand, and rarely used items tuck away. Keep cords managed with a hidden power strip and group related pieces together-coffee setup in one corner, baking tools on a pull-out shelf, cleaning caddy near the sink side. Use the quick reference table below to assign a purpose to each shelf and make styling intentional rather than accidental.
| Zone | Purpose | Quick styling tip |
|---|---|---|
| Top shelf | Daily prep & staging | Tray for frequently used items |
| Middle shelf | Brewing & quick snacks | Ceramic canisters & mug hooks |
| Bottom shelf | Heavy appliances & storage | Baskets and cord clips |
Select durable materials, cohesive color and layered lighting to ensure cohesion and longevity
Think of the cart as a mini-extension of your kitchen – build it with materials that age well and a palette that nods to the rest of the room. opt for finishes that resist spills and scuffs: powder-coated steel frames, a hardwood butcher-block or porcelain tile top, and moisture-resistant cabinetry hardware. Small choices make big differences in cohesion; match metal tones to cabinet pulls and echo countertop hues in accessories so the cart reads as intentional, not temporary.
- Frame: powder-coated steel or stainless
- Top: hardwood, porcelain tile, or tempered glass
- Accents: brass or matte black hardware
Longevity isn’t only about what it’s made of but how it’s lit and integrated - layered lighting keeps the cart useful day and night and highlights its role in the room. Combine general room illumination with a directed task light for prep and a subtle accent or under-shelf LEAD to create warmth and depth; the result is a feature that feels permanent rather than improvised. Keep color choices tied to a two- or three-tone family so the cart complements cabinetry and flooring without competing for attention.
- ambient: ceiling or pendant light
- Task: adjustable lamp or strip under the shelf
- Accent: LED tape or small spotlight
Final Thoughts
A kitchen cart needn’t be a temporary afterthought – with a few thoughtful choices it can read like a built-in: choose a consistent palette, repeat materials or hardware, and anchor it to the room with scale and purpose. Layering function and personality – open shelving for everyday items, a statement surface for prep or display, and a few curated accessories – turns the cart into a reliable partner rather than a purposed prop. Treat styling as an ongoing conversation between how you cook and how you live: adjust, declutter, and refresh small details until the cart feels resolutely yours. permanence in the kitchen is less about permanence of form than about making a piece indispensable - practical, composed, and quietly expressive.