Electrical repairs can be daunting. But with the right knowledge and safety precautions, you can save time and money. This article provides essential tips for DIYers planning to tackle electrical repairs. Plus, knowing when to call an electrician is important for your safety!
DIY electrical repairs need caution and respect. Changing lightbulbs or replacing sockets? No problem. But rewiring and working on the main panel? That’s for the pros. The risk of electrocution and further damage outweighs any savings. According to this local electrician in Kuala Lumpur, even seemingly simple repairs can pose risks if not done correctly. It’s always better to be safe than sorry.
Know your limits. If you’re facing unfamiliar wiring, persistent problems, or issues with circuits that need special tools or skills, call an electrician. They’ve got the training and experience.
Always prioritize safety when working on electrical projects. Disconnect power by turning off the circuit breaker. And wear insulated gloves, safety glasses, and non-conductive footwear. Never work on electrical systems alone; have someone nearby who can help in an emergency.
Prevention is better than cure. Inspect your home’s electrical system for signs of wear. Flickering lights? Overheating outlets? Address issues promptly and avoid bigger problems.
Understanding DIY Electrical Repairs
To learn DIY electrical repairs, keep these 3 steps in mind:
- Assess the issue:
- Take a look.
- Note any visible damages or faulty connections.
- Use a multimeter to check for voltage changes.
- Listen for any strange noises or burning odors.
- Get info:
- Read up on the specific problem.
- Learn the safety measures and local codes.
- Get ready:
- Gather all the tools and materials needed.
- Turn off the power supply.
- Follow instructions carefully.
- Put proper insulation and connect wires.
When to call an electrician?
- If you’re not sure of what to do or lack experience.
- Major power outages, frequent circuit breaker tripping, or flickering lights.
- If wiring is exposed or fixtures are damaged.
- Installing a new circuit breaker panel or rewiring an entire house.
Be informed about basic repairs. But recognize your limits. Some tasks can be done with caution. Others may need a professional. Know what to do but prioritize safety. If sparks fly during your DIY repair, it’s time to call an electrician.
Common DIY Electrical Mistakes to Avoid.
Safety Precautions for DIY Electrical Repairs
In the world of DIY electrical repairs, safety should always be the number one priority. To ensure safety while undertaking DIY electrical repairs, here are a few crucial precautions to keep in mind:
- Stay informed about electrical systems: Acquire a solid understanding of electrical systems and their components to identify potential hazards accurately.
- Turn off the power: Before starting any electrical repair, make sure to switch off the power at the breaker box to prevent electrocution.
- Use appropriate safety gear: Always wear safety gloves, goggles, and clothing to protect yourself from potential electrical shocks and burns.
- Avoid water and dampness: Refrain from working with electrical equipment in wet or damp conditions to reduce the risk of electric shock.
In addition to these precautions, keep in mind that certain unique details can make a significant difference in ensuring safety during DIY electrical repairs. Handling live wires without proper training or attempting repairs beyond your skill level can be extremely dangerous. It is recommended to consult a qualified electrician for complex or unfamiliar tasks.
Now, let’s share a true story that illustrates the importance of adhering to safety precautions while undertaking DIY electrical repairs.
A couple, eager to save money, decided to replace an electrical outlet in their living room without consulting a professional. Despite turning off the power, they accidentally cut through a live wire while attempting the installation. The resulting electric shock caused damage to their home’s wiring and appliances, and they had to call an emergency electrician to fix the situation. This unfortunate incident serves as a reminder of the hazards involved and the need to prioritize safety above all else during DIY electrical repairs.
Turning off the power before attempting DIY electrical repairs is like putting a seatbelt on a roller coaster – it’s just common sense, unless you enjoy electrifying surprises.
Importance of Turning Off Power
It’s essential to switch off the power before attempting any DIY electrical repairs. People often underestimate the risks of working with live electricity, but by switching off the power, you’ll lower the chance of getting electrocuted or having an accident.
Switching off the power not only prevents injury, but your home and electrical system too. Without disconnecting the power supply, there’s risk of short circuits or overloads. This can damage appliances, wiring and even cause a fire – so it’s worth taking a few extra minutes and turning off the power at the breaker box.
In addition to switching off the main power switch, it’s vital to double-check that there’s no residual voltage. Even after flipping the switch, some electrical devices may still hold an electric charge. To make sure all power is disconnected, use a voltage tester to confirm that there’s no current running through the wires.
Safety is key when dealing with electricity. Taking precautions like switching off the power helps prevent accidents and protect your home. So grab your spark-resistant suit and helmet hairstyle, and switch off that power switch before beginning your next project!
Use of Protective Gear
Safety is key when taking on DIY electrical repairs. We need to use the correct protective gear, such as gloves, goggles and non-conductive footwear.
Here’s a breakdown of the protective gear needed for electrical repairs:
| Type | Protective Gear |
|---|---|
| 1 | Gloves |
| 2 | Goggles |
| 3 | Non-conductive footwear |
It’s important to consider extra details too. Insulated gloves with the correct voltage rating can reduce electric shock risk. Durable goggles must provide suitable eye protection from sparks and debris. Plus, reliable non-conductive footwear prevents grounding and electrocution.
Remember, using the right protective gear greatly reduces hazards during DIY electrical repairs. Safety comes first when taking on such projects! And of course, you can’t fix ignorance with a wire cutter.
Essential Tools for DIY Electrical Repairs
Essential Tools for DIY Electrical Repairs:
To successfully perform DIY electrical repairs, it is crucial to have the right tools for the job. The following tools are essential for any DIY enthusiast looking to delve into electrical repairs:
Tabletop Power Drill – This versatile tool is indispensable for drilling holes, driving screws, and performing various tasks in electrical repair projects.
Wire Strippers – These tools are designed to strip the insulation from electrical wires, allowing for easy connection and termination.
Circuit Tester – A circuit tester is essential for checking if electrical circuits are live or properly grounded before starting any repair work. It ensures safety and prevents accidents.
Pliers – Pliers come in handy for gripping, bending, and cutting wires. These are essential for tasks that require precise control and maneuverability.
Voltage Tester – This tool is used to determine if electrical outlets or circuits are energized. It helps in identifying potential electrical hazards and ensures the safety of the DIY enthusiast.
Insulated Screwdriver Set – Specialized insulated screwdrivers are crucial in electrical repairs to prevent electric shocks. These screwdrivers are designed to safely handle electrical components.
Wire Nuts and Electrical Tape – These materials are necessary for securely connecting and insulating wires. They ensure proper electrical connections and prevent any risk of short circuits.
By equipping yourself with these essential tools, you can confidently undertake DIY electrical repairs, ensuring safety and precision in your work.
Don’t miss out on the chance to acquire these tools and enhance your DIY electrical repair skills. Take the necessary step towards becoming an efficient DIY enthusiast today.
Using a screwdriver for electrical repairs is like using a spoon to eat soup – it’s not technically wrong, but it’s probably going to end in disaster.
Screwdrivers
Choose the right screwdriver for each task! Flathead, Phillips, or Torx – each has its own purpose. Flathead is for single slot screws like electrical outlets and switches. Phillips is for cross-shaped recesses like light fixtures and appliances. Torx is for star-shaped patterns in electronics and circuit boards.
Electrician’s screwdrivers have insulated handles to protect against electrical shocks. For successful DIY repairs, invest in high-quality brands and maintain them with regular cleaning and dry storage. Wear protective gear like gloves and safety glasses when working with electricity. And when it’s time for wires to separate, get wire strippers.
Wire Strippers
Wire strippers are essential tools for DIY electrical repairs. They help in removing insulation from wires for easier connection or splicing. Different sizes and types of strippers exist, depending on the wire gauge and material.
Adjustable jaws let you set the desired depth, so only the insulation is taken off without damaging the wires. Some even have built-in cutting blades for trimming the wires to length. Plus, a crimper may be included for easy connector installation.
You can choose manual or automatic models, based on your preference and comfort level. With wire strippers, DIYers can tackle electrical projects without risk. So, when fixing switches or outlets, make sure you have a good pair of wire strippers!
But, be cautious when using them. Follow safety guidelines when working with electricity. And consult an electrician if you’re uncertain about your project. Stay safe and get creative with your DIY electrical repairs!
Voltage Tester
A voltage tester is a must-have for DIY electrical repairs. It helps you check if circuits are live or not and keeps you safe. Here are some of the different types of voltage testers and what they do:
- Non-Contact Voltage Tester: It detects voltage without touching the electrical system. It uses electromagnetic fields to detect if voltage is present.
- Circuit Tester (Neon Tester): A small neon bulb lights up when it detects voltage. It’s used to check if an electrical current is running through a wire or device.
- Digital Multimeter: This tool measures voltage, current, and resistance. It can also troubleshoot complex electrical issues.
- Two-Pole Voltage Tester: This tests outlets and switches for proper wiring. It checks if there is voltage between hot and neutral wires.
Having a voltage tester in your toolbox means you can detect live wires and avoid electric shocks. Follow safety precautions and turn off the power before doing electrical work. And remember: DIY electrical repairs can save you money and make you proud – just watch out for those sparks!
Common Electrical Repairs You Can Do Yourself
Common Electrical Repairs You Can Perform Yourself:
- Repairing a broken electrical switch:
- Switch off the power supply
- Remove the cover plate
- Test the switch with a multimeter
- Replace faulty components if necessary
- Reassemble the switch
- Installing a new light fixture:
- Switch off the power supply
- Remove the existing fixture
- Connect the new fixture following the manufacturer’s instructions
- Secure it in place
- Replacing a damaged electrical outlet:
- Turn off the power supply
- Remove the cover plate
- Disconnect the wires from the old outlet
- Connect them to the new outlet following the correct wiring scheme
- Reinstall the cover plate
- Fixing a tripping circuit breaker:
- Identify the cause of the overload or short circuit
- Disconnect the devices causing the issue
- Reset the circuit breaker
- Distribute the electrical load more evenly
- Repairing a loose electrical connection:
- Turn off the power supply
- Identify the loose connection
- Tighten it securely
- Insulate it properly to avoid future issues
These are some common electrical repairs you can easily handle yourself. However, it is important to remember that working with electrical systems can be dangerous if you are not skilled or knowledgeable. If you feel uncomfortable or unsure about any electrical repair, it is best to call a licensed electrician. Your safety should always be a top priority.
In addition to these common repairs, it is crucial to follow proper electrical safety practices at all times. Always switch off the power before working on any electrical component, wear appropriate protective gear, and use insulated tools to reduce the risk of electrical shocks or accidents.
Changing Light Fixtures
Fancy a new look for your space? Light fixtures can make a big difference! Here’s a guide to get you started:
- Step 1: Safety first! Turn off the power.
- Step 2: Unscrew and disconnect the old fixture.
- Step 3: Connect the wires of the new fixture and secure it in place.
- Step 4: Turn on the power and admire your new space!
Remember to read the instruction manual that comes with your new fixture. These steps can transform the atmosphere of a room quickly. Make the most of this chance to add a touch of elegance to your home.
Swapping switches and outlets may seem daunting, but have no fear – it’s a bright idea to do these electrical repairs yourself!
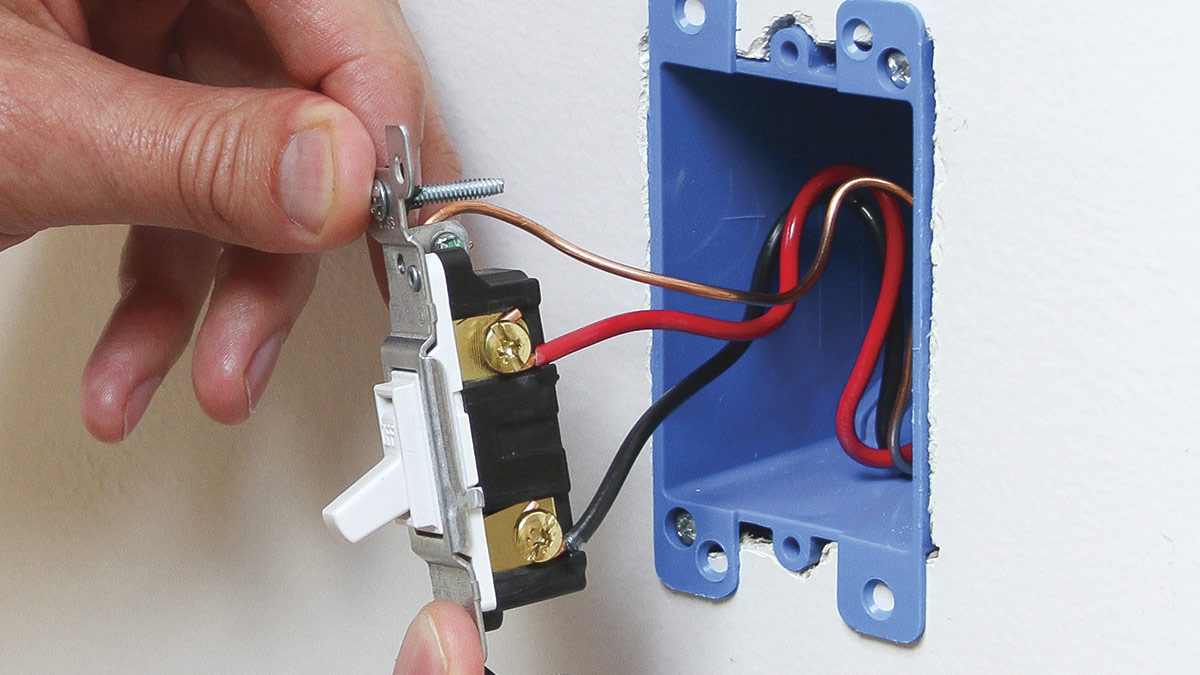
Replacing Switches and Outlets
To keep your electrical system safe and efficient, replacing switches and outlets is an easy repair you can do yourself! Here’s a foolproof 6-step guide:
- Turn off the power to the circuit at the main breaker panel. This will protect you from electric shocks while working.
- Unscrew the mounting screws that hold the switch or outlet in place. Use a flathead screwdriver to remove the switch plate or outlet cover.
- Be extra careful not to touch any live wires as you pull the switch or outlet out of the electrical box. Make sure to note how the wires are connected to the terminals.
- Prepare the new one by connecting the wires to their respective terminals. Secure them with wire nuts or terminal screws.
- Put the new switch or outlet back in the electrical box, making sure none of the wires are pinched or exposed. Tighten the mounting screws.
- Time to test it! Put the switch plate or outlet cover back on and turn on the power at the main breaker panel. Make sure it’s working properly.
If it’s too tricky, always consult an electrician for guidance. Safety is the number one priority when it comes to electrical repairs!
Fixing Wiring Issues
Fixing wiring can be important for safety and efficiency. It’s about spotting and fixing faulty connections or broken wires. Taking care of issues quickly can prevent potential hazards like shocks and fires.
Here’s a guide for common wiring issues:
- Spot the problem area. Check for signs of damage, like frayed wires or loose connections.
- Turn off power. A must for electrical repairs and safety from electric shocks.
- Replace damaged wires. Cut out the damaged parts, strip off insulation from each end and connect them.
- Tighten loose connections. Use a screwdriver or pliers to secure the connections.
- Test the repairs. Turn on the power and test the circuit by flipping switches or using a voltage tester.
- Get help if needed. If you can’t do the repairs or feel uncomfortable, call a qualified electrician.
Safety precautions are key. If sparks fly, call an electrician for expert guidance and proper repairs. This ensures both peace of mind and electrical efficiency.
Knowing When to Call an Electrician
When it comes to electrical repairs, it is crucial to know when to call an electrician. Attempting complex electrical work without proper knowledge and expertise can lead to serious safety hazards and costly mistakes. Instead of risking potential danger, it is wise to recognize situations that require professional assistance.
Electrical systems can be intricate, and even seemingly minor issues can have underlying complexities. A variation in the expected pattern of electrical flow, such as dimming lights or frequently tripping circuit breakers, may indicate larger problems that require expert attention. Identifying these signs and promptly seeking the help of an electrician can prevent further damage and ensure the safety of your home or business.
Additionally, it is crucial to understand that certain electrical projects are beyond the scope of DIY repairs. Tasks involving the main electrical panel, such as replacing fuses or circuit breakers, should be handled by certified electricians. Similarly, installations that require working with high voltage systems, such as adding new outlets or wiring expansions, demand professional expertise to avoid any potential risks.
While homeowners and DIY enthusiasts can successfully tackle simple electrical repairs like changing light fixtures or replacing outlets, there are instances when it is essential to defer to professional help. Not only will this guarantee a job done accurately, but it will also provide peace of mind knowing that the repairs were performed in compliance with safety codes and regulations.
Pro Tip: Remember, when in doubt, always consult with a licensed electrician to ensure the safety of your electrical system.
Warning Signs: If your lights flicker like a romantic candlelit dinner or your outlets spark like a Fourth of July celebration, it’s probably time to ditch the DIY dreams and call an electrician.
Warning Signs
It may be time to call an electrician if you notice any of these warning signs:
- Flickering lights.
- Electrical shocks when touching outlets or appliances.
- Burning smell from outlets or appliances.
- Circuit breakers that often trip.
- Hot switches and outlets.
- Sparks coming from outlets.
Plus, sky-high energy bills without changing usage patterns might also be a sign of trouble.
Complex Electrical Systems
Let’s look at a table with components and their roles in electrical systems:
| Component | Role |
|---|---|
| Circuit breakers | Protect from overcurrents. |
| Transformers | Change voltage levels. |
| Switches | Control electricity. |
| Conductors | Carry current. |
| Capacitors | Store energy. |
| Relays | Use small signals to control big current. |
These elements are necessary for safe and consistent power delivery. Professional help is needed for installation, maintenance, and repairs. DIY can be risky. So, when dealing with complex electrical systems, get a qualified electrician. Safety should be first. Don’t wait until sparks fly and you’re dancing the electric slide! Get help before your DIY becomes a shocking house party.
Conclusion
DIY electrical repairs can save money and make you proud! Changing light fixtures, replacing outlets, and troubleshooting basic issues like flipped circuit breakers or tripped GFCI outlets can be done without a professional. However, it’s important to understand the limits of your knowledge. Simple problems can turn out to be more complex and require specialized skills. When this happens, it’s best to call an electrician.
Plus, electricity is dangerous. Mishandling components or not following safety measures can lead to injuries or fatalities. This article was written to give you tips on DIY repairs, but also to stress the importance of safety!