Electricity is fundamental to the modern household. It’s used to power your lights, heating, cooking and even recharge your cell phones and tablets. It’s easy to forget that electricity didn’t exist before about 1880.
Now it is in every part of your home and your life which is why it is important to understand how it works. You may not wish to adjust your home electrics and prefer to use a reputable electrical services firm. But, this doesn’t mean that you shouldn’t understand the basic operation.
What Is The Switch Loop?
The switch loop is more than just a component of your home’s electrical system; it’s the linchpin that connects your light to its switch. This ingenious setup ensures that you can effortlessly control your lighting—turning it on or off—without the hassle of removing the bulb.
At its core, the switch loop is versatile. Whether you’re looking to set up a single switch or integrate multiple switches, the switch loop can accommodate. Each switch, regardless of the number, can operate the same light source. The configuration of a switch loop, however, can vary. The design hinges on the direction of the live feed: is it channeled directly to the switch or does it first go to the light?
One of the standout features of the switch loop is its ability to repurpose a neutral wire, converting it into a live wire. This transformation underscores the importance of understanding the mechanics of the switch loop. If you ever find yourself working with or examining the wires in your light fitting, it’s crucial to remember that not just the conventionally colored live wire (often brown) carries current. The neutral wire, when part of a switch loop, can be just as live, emphasizing the need for caution and awareness.
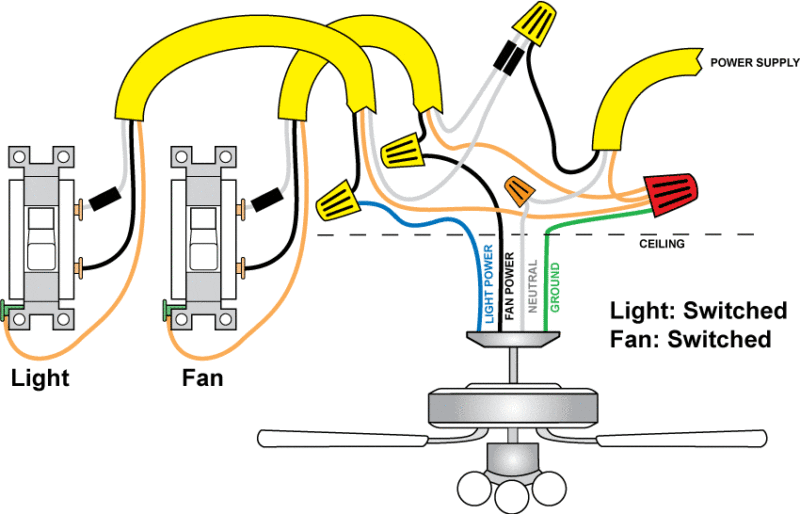
Creating The Switch Loop – Power To The Light First

The first stage is to identify the live wire coming from the light bulb.
You can then connect this to a neutral wire that runs to the light switch; the power doesn’t go to the bulb at this stage.
It is important to mark the neutral wire to ensure you know it is acting as a live one.
The neutral supply to the light should be connected as normal.
At the switch you will have power coming in via the neutral wire. This should be connected to the live in terminal on your switch. You can then connect the live wire of the cable between switch and bulb to the L1 connection on your switch. The other end of this should be connected to the live in on your light.

Finally you want to continue your neutral feed. This means running the fourth wire in your switch feed to the neutral terminal on your switch and the neutral in your light fitting. Your earth wires should be connected as normal.
The power has now been rerouted to the switch, allowing you to turn the light on and off whenever you need to.
It is possible to add lights to this circuit. The live, neutral and earth for each of the lights simply connect to the cables entering the light fitting. This ensures the switch loop wiring is no disturbed and remains effective.
Switch Loop When Power Arrives At the Switch First

This is actually very similar to the above method. The key difference is in where the live power is coming from.
You may think that you can simply add the incoming power to the switch and send it out to the light, allowing the switch to control the light.
Fortunately this is possible, making this the easiest option but the most unlikely one that you’ll come across.
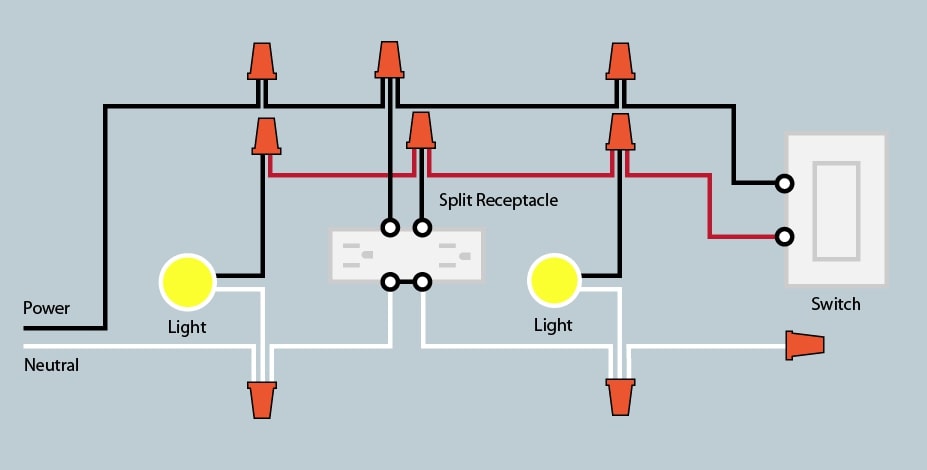
Adding Two Switches To A Loop

In expansive spaces or multi-level homes, the convenience of controlling a light source from multiple locations becomes evident. This is where integrating a second switch into your switch loop becomes invaluable. Let’s delve into the process and understand the nuances.
1. Identifying the Need
For large rooms or homes with multiple floors, having the ability to control a light from both upstairs and downstairs offers unparalleled convenience. This requires the integration of a second switch into your existing switch loop.
2. Setting the Stage
Before diving into the process, ensure that the power source is directed towards the light. This will be the starting point for your dual switch setup.
3. Working with the Neutral Cable
Firstly, channel the power from the light to one of your switches using the neutral cable. This step mirrors the approach detailed earlier in the article. Once this is done, interconnect the neutral cables for the power input, both switches, and the light. This forms the foundation for your dual switch system.
4. Connecting the Switches
To ensure both switches operate independently yet control the same light source, run a cable between the L1 sockets on both switches. This interconnection is pivotal for the dual control mechanism.
5. Finalizing the Circuit
Post the switch interconnection, direct a cable from the power input of the second switch to the live connector on the light. It’s essential to connect the neutral input from the main power source to the light and ensure it’s linked to both switch sockets. Given the complexity, a four-core cable becomes indispensable for this setup.
6. Safety Precautions
Safety can’t be stressed enough. Always mark cables that carry power, especially if they deviate from the standard live color coding. Proper labeling ensures that anyone working with the system in the future is aware of potential live wires, reducing the risk of accidental electrocution.
Safety First
Always remember, electricity is not something to be trifled with. If you’re new to electrical work or unsure about any step, it’s always best to consult with a professional. Even if you’ve completed the setup, having a professional review your work ensures safety and functionality.
Remember, electricity is dangerous; if you’ve not tried this before then at the least you should get your work checked by a professional before you start using your new switch on a regular basis.
Frequently Asked Questions
- What is the primary purpose of a switch loop?
- A switch loop allows you to control a light source without having to remove the bulb. It acts as a connection between the light and its switch.
- Is it safe to set up a switch loop by myself?
- If you have experience with electrical work and are confident in your skills, you can set up a switch loop. However, always prioritize safety and consider consulting with a professional.
- Why is it essential to mark the neutral wire in a switch loop?
- In a switch loop, the neutral wire can act as a live wire. Marking it ensures that anyone working with the wiring in the future is aware of its changed function, preventing potential electrical hazards.
- Can I add more than two switches to a loop?
- Yes, it’s possible to add more switches, but the complexity increases with each addition. It’s recommended to consult with an electrical expert for such configurations.
- What precautions should I take when working with switch loops?
- Always turn off the power from the main source before starting any electrical work. Use insulated tools, wear protective gloves, and ensure your work area is dry. If in doubt, seek professional assistance.


Can you add an example of how to add an an “always on” GFI Outlet to a pre-2011 Switch Loop that has power at the fixture and 1 switch? I have a bathroom that has an integrated light fixture and outlet today and would like an outlet on wall thats always powered.
Hi Don, you can follow the steps below (but remember, while these steps provide a general guide, it’s crucial to consult or hire a licensed electrician if you’re unsure about any part of the process):
1. Safety First
Before starting any electrical work, ensure the power is turned off at the circuit breaker. Use a voltage tester to confirm that there’s no electricity flowing to the wires you’ll be working with.
2. Identify the Wiring
Locate the switch loop wiring in your bathroom. Typically, in a pre-2011 switch loop, the power source (hot wire) goes to the fixture first and then to the switch.
3. Access the Fixture Box
Open the fixture box where the power source is located. You should see a black (hot) wire, a white (neutral) wire, and possibly a ground wire.
4. Install a New Electrical Box for the GFI Outlet
Choose a location on the wall where you want the “always on” outlet. Install a new electrical box at this location.
5. Run New Wiring
From the fixture box, run a new 12/2 or 14/2 cable (depending on the circuit’s amperage) to the new electrical box for the GFI outlet. This cable will provide constant power to the outlet.
6. Make Connections at the Fixture Box
Connect the black (hot) wire from the new cable to the black (hot) wire in the fixture box.
Connect the white (neutral) wire from the new cable to the white (neutral) wire in the fixture box.
If there’s a ground wire, connect it to the ground wire in the fixture box or to the box itself if it’s metal.
7. Wire the GFI Outlet
At the new electrical box:
Connect the black (hot) wire to the brass screw on the GFI outlet.
Connect the white (neutral) wire to the silver screw on the GFI outlet.
Connect the ground wire (if present) to the green screw on the GFI outlet.
8. Secure the GFI Outlet and Restore Power
Mount the GFI outlet into the electrical box and attach the faceplate. Turn the power back on at the circuit breaker. Test the outlet to ensure it’s “always on” and the switch loop operates as before.